Tuesday, January 1, 2013

Australian x-ray and dot style animals


All artwork done by 6th grade students with no previous art classes! class of 35 students for this group
(if you "Pin" please, please link back to this post or at least my website....)

The next part of our Australia unit was a x-ray style animal mixed media project. We once again looked at examples of x-ray style rock art and modern day Aboriginal style art that incorporates x-ray style. Last year I learned about the wonderful work of Australian children's author and illustrator Bronwyn Bancroft (you can visit her website here). I try to get several of her books to show the kids how she uses Aboriginal symbols, dot painting and x-ray style to make modern day art. We particularly love her animal ABC book because of all the new animals we learn about.

Next students practice drawing 8 different Australian animals using some worksheets I got from a class years ago. The kids can also look at images from Bancroft's book and try to draw additional animals.

I have tried so many versions of this lesson over the last 8 years from scratch art to paint to oil pastel. With this years combo I am 90% happy and I think next year I will have finally settled on the official lesson.

The kids then choose the animal they want to draw for their final work of art and receive a square 12 inch by 12 inch sheet of light brown construction paper. They use a ruler to make a boarder and then in pencil draw a pattern in the boarder, their animal in the middle and two symbols that would correlate with that animal. So for the platypus above the student added the symbol for river and sun and the emu below has sun and the symbol for emu tracks.
Student's went over all pencil lines with black crayon or sharpie then colored their animal and symbols using colored pencils and paying attention to correct use of material to get vibrant color.

Next came the dotting. I asked the students to find 3/4 colors they used in their animal and symbols and dot around the animal using radiating lines of those colors. Practicing our doting in the previous lesson really helped with the quality of dots in this lesson.

Then came the boarder. I had the kids use black glue to outline the boarder and then set it to dry overnight. 

Then, and this is the part that I still don't love, I had the kids use chalk pastel in two or three colors to color in the boarders. While I think the colors turned out nice and the kids enjoyed using the chalk...even after spraying the colors smudged and started to get messy.  I still suspect that this is an side effect of the super junky chalk pastels I have.
Yet as I have mentioned before, chalk pastel is my least used media in my classroom so I don't want to waste any of my tinny budget buying nice sets. Next year I think I will simply have the kids use oil pastel instead of chalk.
This student convinced me to let her add two baby dingoes instead of two symbols
and this young man choose to draw a Numbat (yes that is a real animal) along with another type of small rodent who's name I don't remember.
 I'm quiet happy with the evolution of this lesson and the quality of artwork this year's student's produced.

Next up: this years Australia unit "wild card" lesson.

Friday, December 28, 2012

Australia dot style mini paintings


Time for 6th grade's yearly study of Australian Aboriginal art. We always learn about dot painting and x-ray style drawing and then throw in something a little different for fun. Last year we made the x-ray style stuffies...I'll post this year's wild card in a few days.  We start our unit learning a bit about the Aboriginal Dream time stories, symbols and dot painting. We talk about why Dream time stories and symbols differ from region to region and most are not to be shared with non Aboriginal people. We also talk about how traditionally dot paintings were not to be shared with non Aboriginals and look at how modern day Australian artists are creating dot paintings that do not revel sacred stories.


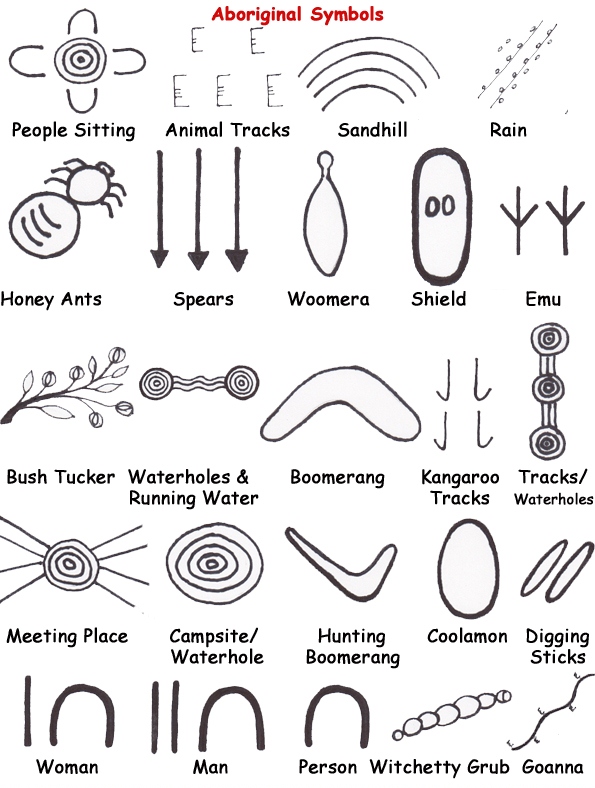
After our day of learning about Australian Aboriginal art we looked at a set of Aboriginal symbols and played matching and story building games...I got my set of symbols from a class I took but we also use this set from Aboriginal art online

and this set from this site http://www.aboriginalartshop.com/assets/Artlandish_Symbols_completed_-_footer2.jpg

After practicing using the symbols for storytelling each student chooses one to three symbols for their mini paintings that are about 3x5 inches and done on scrap matt board.

Students paint their matt board a solid base color with acrylic and set it to dry. When dry they sketch their symbol(s) and paint them in solid black.  Then using either the back of a crayon, the back of a paintbrush or the back or point of a bamboo skewer each student radiates the outline of their symbol in dots using a 2-3 colors.
Doing "mini" paintings makes these novel and keeps the kids from getting burnt out on dotting so the lesson gets done in two days instead of dragging on forever. Plus is gives the kids good dotting practice for their next x-ray and dot style animal lesson.
Great work from this year's group of 6th graders....I wish I had time to post all 35 of them !

Sunday, December 23, 2012

fun with calligrams

My 6th-8th graders had a great time with calligrams this fall. They got really into it this year....I attribute three changes I made to this years lesson and a T.V. show.

Changes this year:
This year I if they were going to do an object I had them go look up how to say that object in six different languages. They really liked that. This girl also looked up how to say the different parts of a car in different languages.


I also said they could expand from a poem or text that they wrote to other variety of text such as song lyrics (clean version) which a lot of kids choose to do


and dialogue from a movie was another popular choice


Change three was that I got micro thin sharpies along with my thin felt tip markers. The kids felt they had better control of their lettering with the super thin sharpies.

The we had the kids that stuck with with words that described the object in English only

Man do they love the new Dr. Who

Then some 7th grade work:


and some 6th graders


 proof that using just the name of the object but a variety of text size can be very effective 

and the finally there is a show on PBS kids called Word World that has uses very basic calligrams and quite a few kids mentioned when I introduced the lesson.

Wednesday, December 12, 2012

a peak inside....

Over the years I have had many many students who are on the autism spectrum...some love art some don't, some have talent for it and others not. However, the last two years I have had a young man who is Autistic in the more traditional definition of the term (I don't know how to better word it). He is very quiet, has a really hard time communicating with others, he seems very contained in his own head and as a teacher, and I know for his peers, it is very hard to get a sense of who he is as a person. While this student and I have "talked" many times and I have learned how to help him understand and process what I want him to do in the classroom, this lesson was the first time I felt like I was able to see the real him.... and what an amazing young man he is.

 This was his artwork for the illuminated letter lesson that I posted about before. This was the first time he had a really open ended lesson from me but not the first time he had worked in colored pencil in my classroom.

He used no how to draw books, just asked to look at my book of reptiles and if he could use a imaginary animal (yes of course!) ...these are just the wonderfully expressive and charming animals and images he choose to express who he is and what he likes.

I have this in a frame in the office so the reflection off the glass is making the photos a bit odd looking but I feel like you can see the personality in his creatures and the attention to detail he used

I was hoping to talk with his parents at conferences but it didn't work out....I know he likes to draw at home but these are so awesome  I think he would be a great book illustrator (and maybe author!) when he get's older.
I really look forward to to seeing what else he makes this year and I am going to make a big effort to adapt my lessons for him so that he has more time to work on them and can show his own style.
At the end of the lesson I was praising him for what an amazing job he did and I don't know if it made him uncomfortable, or if he has a hard time showing happiness, but he said, "ok, good" and kept his very clam serious look he always has. I hope inside he was smiling and knowing what a amazing young man he is.

Thursday, December 6, 2012

glazing green-wear? please help


I'm making cupcake stands with my 6/7th grade class... it has been a slow, less than ideal lesson that will need major work before I do it again. It has taken us so long to build them that I am really crunched for time on firing the green-wear and then glaze firing before winter break and there is no way I am letting this lesson drag on after the break.
I have always been told NOT to apply glaze to green-wear and fire it for several reasons that I fully  understand but I basically have no choice this time.

So my question is: have you ever glazed green-wear and then successfully fired it (low fire) any suggestions or tips that you can pass along to me so I don't turn this blah clay lesson into an epic disaster of a firing?

p.s. we do use ducan undercoats....in this case we will be using the sprinkle series and I always have the kids add a layer of clear coat