Showing posts with label 4th-5th grade. Show all posts

Wednesday, November 9, 2011

waiting for baby and sunflowers

Not my best photos ever....sorry. The colors are much brighter in real life.

Tomorrow is the big day, the due date of my first child. Of course we know babies rarely come on their due date so we are not getting our hopes up. My husband really wants an 11/11 or and 11/12 baby. I don't even know what to think at this point. Especially after my Dr. appt LAST Tuesday when the midwife told me...and I quote..." I will be shocked if you don't have the baby by Monday!". I got so excited and spent all of last week waiting and prepping to leave my classroom. On Sunday night I started to feel really strange and icky...like I was getting a flu or a cold, hadn't I read that feeling like you are getting a cold/flu is a sign you are about to go into labor! I called my maternity sub and asked her to go in for me the next morning and went to bed thinking I would wake up in the night in labor.

Turns out that strange, sick feeling...yah that was me getting sick... not having a baby. Having a nasty cold is never fun, having a cold when 39 weeks and 6 days pregnant is not fun at ALL.
For me the hardest part has been staying home sick. I never stay home from school...I admit I went to teach while I had the swine flu a few years ago. I went to teach the morning I found out my dad had died last year. So far in my pregnancy I had not missed a single day of teaching.
keep reading and you'll get to the lesson...

I'm not a callous, germ spreading, horrible person. I just can't really relax the way most people can. Being occupied is what helps me get through things and what keeps you more occupied than teaching! However, I knew that with my due date this close I had to walk away from my classroom, stay home and get well ASAP. I also was about to snap from the adults at the school asking me if I should be there and if the baby had come yet. Hello, if I am still standing here and my belly still looks like I swallowed a beach ball then NO I have not had the baby!
keep reading...

My poor sub has had to put up with pages and pages of overly detailed and controlling lesson plans and "suggestions". I'm sure she is equally ready for me to have the baby so I don't have hours upon hours of time to be fixated on my classroom.
I'm bummed I won't be able to post all the lessons going on in my room while I'm gone. Maybe I can talk her into taking some photos .
now for the lesson!
I realized I never posted this sunflower lesson that we did in September and is heavily inspired by Gail at That Artist Women and this lesson. We know I hate chalk pastels so I make sure to to at least one chalk pastel lesson per term so I don't create another generation of students that hate them. So we did Gail's glue resist sunflowers and then we zoomed in. I wanted the kids to work on their OBSERVATIONAL drawing skills so we really observed one sunflower petal and then zoomed in one more time to view the veins of a sunflower leaf. We used oil pastel and watercolor for these zoom ins. All three parts were mounted onto a big sheet of construction paper. Man these photos did not turn out well. I promise the looked good in person. The kids really liked taking apart the sunflowers to observe like scientists. I think it would be really cool to do this with a fruit or veggie where you could do some dissecting or flowers like Lilly's or maybe a small household appliance like a clock or toaster. I bet that would really interest some young men (and women) to take apart and draw a broken toaster or game controller.

you know the deal...click to enlarge

Saturday, November 5, 2011

Franz Marc results-6th grade

LOVE IT!!!

I don't think I've been this happy with the results of a lesson in a LONG time... this may go down as one of my top 5 fav lessons ever. Thanks to everyone who gave input into the lesson design process and for the many of you who expressed an interest in Franz Marc I would highly suggest using him as a spring board for student art.

I put a lot of class time/prep into this lesson and I think it was well worth it. I made two slide shows about Franz Marc...one more about his life and one more focused on looking for the elements of art in his work. Students had to follow along with handouts for both slide shows. They also had to work individually and in groups to brainstorm personality traits that went with 12 animals and 12 colors. We did practice coloring with the oil pastels to understand how to apply them thick and use value and we talked extensively about how to choose the colors we used in our work of art.

In the end each student had to choose an animal that symbolized them along with a color or selection of colors that symbolized them. They had to be able to write about AND verbalize to me why they choose both their animal and color before moving forward. I also asked for the animals to be in a position that related to the personality traits (crouched for shy, slinking for sly, looking upward for positive....so on). Each animal had to have light, med and dark of the color used. Each animal was to be in an environment and student's were to use the complementary color of their animal in either a space that touched their animal or in a large part of their background.

Beyond that I tried to back off and let each student draw in the style they wanted and go about coloring how they wanted. I did ask several students to outline their animals in black or a dark color so they would stand out. I wish I had asked this young lady to do so as her AMAZING dolphin is a bit lost in her equally cool background.

I was really surprised by how far the students pushed themselves and how inventive they were. Really I think with middle school students you get better results when you back off and give them some space to do their thing. They get so much more invested in the process.

To end it all I made them write a formal artist statement about their work....their least favorite part and come up with a title for their work....a part they did enjoy. This lesson re-confirmed my belief that Crayola oil pastels are superior to all others that working on either letter size or a tinny big bigger sized paper is perfect for most middle school student attention spans and that the more choices you give a student regarding a lesson the better things will turn out.

I will admit to meddling in one part of this lesson. Many students just could not draw big enough to make a good composition. I admit I took about 75% of the student drawings to the photocopier and enlarged them. I feel ok with this choice. I also allowed students to look at a LOT of how to draw books to help them draw their animal.

I really hope a lot of the kids will choose this to be their work of art that hangs in the spring art show...but I won't pressure them because I really want it to be their choice.

Thursday, October 27, 2011

O'keeffe inspired abstract landscapes

(aka Slug paintings)
I'm really excited to share this lesson I did with my 6th graders during their color/painting unit. I'm also proud to say I came up with this one and didn't have to "barrow" it (although I'm sure plenty of people have done similar things). I think this would be good for 4th-8th grade.

After completing our color mixing stars it was time to apply our new skills and learn how to tint and shade. I flipped through my art books looking for inspiration. When I came across the work of Georgia O'keeffe I knew she would be a great artist to study but I didn't want to do the typical large flowers. Well thank you Georgia! She has a impressive body of work of landscapes and super, super abstracted flowers. Paintings that I feel is not usually represented when people talk about her work.
So I made a Google Doc about O'keeffe that featured some of her lesser known works. I made sure to include works that used warm colors, cool colors, neutrals and tints and shades.
Here is a small sampling of O'Keeffe's work that inspired us

I wasn't too surprised that most of my student's were somewhat familiar with her work and they had a great time viwing and talking about her work and guessing what the paintings might be about. They wanted to talk and talk and talk about her art. After an entire class period I had to stop them so we could start making art!

I gave each student three rectangles of paper. On the back of paper one I had them list the warm colors (primary, secondary and intermediate). On paper two we listed the cool colors and on paper three I had the kids list a color and then how to make a tint and a shade. Then we flipped the papers back over and lined them up touching each other.

I had the kids start at the upper left of the 1st paper and pretend they were a slug crawling acrross the paper leaving a trail of slime. They slimed across all three papers from left to right. Then we went back to the left-hand paper and down a bit and repeated the slug trail. And then one more time. Finally I said the slug could make one shape on each small paper.

Now each rectangle of paper has 5 spaces to paint. On paper one kids had to mix and use the warm colors, a different color in each shape/space. Same on the cool color paper and ditto on the tint shade paper.
Some kids were really confused on the idea of tint and shade (like this example) but the end result is still wonderful.

After each rectangle was dry I had the kids line up their papers again and go over their dividing lines with a thin line of black paint. This was really hard for a lot of kids and made the artwork look a bit messy. In the future I think I will have them make the dividing lines with black oil pastel or marker. These look so good on display together. Even if the rectangles did not get matched up correctly they still are successful.

Thursday, September 8, 2011

the bucket day 4 - Eat your fruit! and my new job


Two years of blogging (can you believe it!) has taught me lesson first then ramble. So let's get back into the bucket for another lesson.

Today I bring you what I feel is another classic lesson but one that I haven't seen posted recently. Lets call it, "Eat your fruit." Eat your fruit is a classic observational drawing lesson with a twist and a motivation...you eat your subject matter. I feel Eat your fruit could be used from K-12. Seriously. This is a great way to examine sequencing with younger students. I think it would make a nice tie-in to K-2nd students who are talking about tracking the series of events in a story. You could do only three drawings. One with the fruit at the start, one with the fruit with a bite or two gone and one with the leftovers of the fruit.

At the middle and high level it is also a reminder that there are smaller steps that happen between the beginning the middle and the end of a story. The drawing above actually goes with a claymation unit I do. Before I let the kids start with the claymation I ask them to really think about story sequencing and how with any form of animation you must use many frames with only small changes to create a story.

After doing this lesson several times I think 6 "cells" is the best # for a middle school attention span and class length. I also favor colored pencil, watercolor pencil or crayon as the media for coloring. When doing this lesson you need to eat and draw on day one. You WILL run out of time if you eat, draw and color (unless you have a double block period). So there is an issue of when you go to add color the next class your fruit is no longer around. I have found three possible solutions for this issue.
1. Have a new piece of fruit for the student to look at for color
2. Have the student photograph their fruit before they start to eat it and once when you can see the inside colors
3. Make the students make notes to themselves about what colors they observe while doing the day one drawing. Have them lightly mark highlights and shadows. Basically artist journal approach.
I use this lesson to really push for shadow, highlight and shading to show form.

OH YEAH! Beware if you use grapes...the kids will take FOREVER to draw them. Also drawing the skin texture of oranges can drive a lot of students to the breaking point.... if you want an interesting internal texture I suggest a kiwi instead.

Of course if you have some students who need a challenge break out the watercolor or acrylic paints. I had these two young ladies work in acrylic paint last spring and they made some nice fruits.
(7th grade student who really "gets it")
(6th grade student who wanted a challenge)

As for my new job...knock on wood, don't want to jinx anything but it is 100000000x times better than my old position. The fact that I only have to prep for three grade levels is making a huge difference in my ability to focus, get work done, keep track of what I am doing, what I have taught and plan better instruction. The fact that I'm only teaching 1/2 time is a huge relief on my 32 week pregnant body. The students are way nicer and more focused and so far I have had very little behavior issues. Granted it was just the first week of school but hopefully they will be engaged enough in the lessons to keep from having any major behavior issues. I also laid down the law early on and have not let anything slide. The only thing I am not a huge fan of is the school policy that no student is allowed to go to the bathroom during class. They are supposed to bathroom during their 4 min passing period....but the school is 4 floors high and it takes all 4 min to get from one place to another. I feel telling a student they can't bathroom when they naturally need to is borderline abusive. Until I see students abusing the privilege I am allowing them to the bathroom across the hall from my room.

As for my baby belly...it is getting pretty big but I still feel like I have good balance and am able to sleep at night as long as I don't nap during the day. While my belly measures on track and the baby is gaining weight as he should, I personally am struggling to gain any weight. I now have to eat two tablespoons of peanut butter a day on top of my other calories in an effort to up my protein intake and put on a few pounds. Otherwise I have to start drinking supplement shakes like Ensure. Ick. Squirmy, as we call him, makes me NOT want to eat sugar or junk food. I have zero cravings other than fruit. I think he takes after his vegetarian father and I hope he keeps up the healthy eating habits when he is outside of the womb....I doubt I will be able to!
(sigh, no I am not naming his Clay or Art...its getting old people)

Monday, August 22, 2011

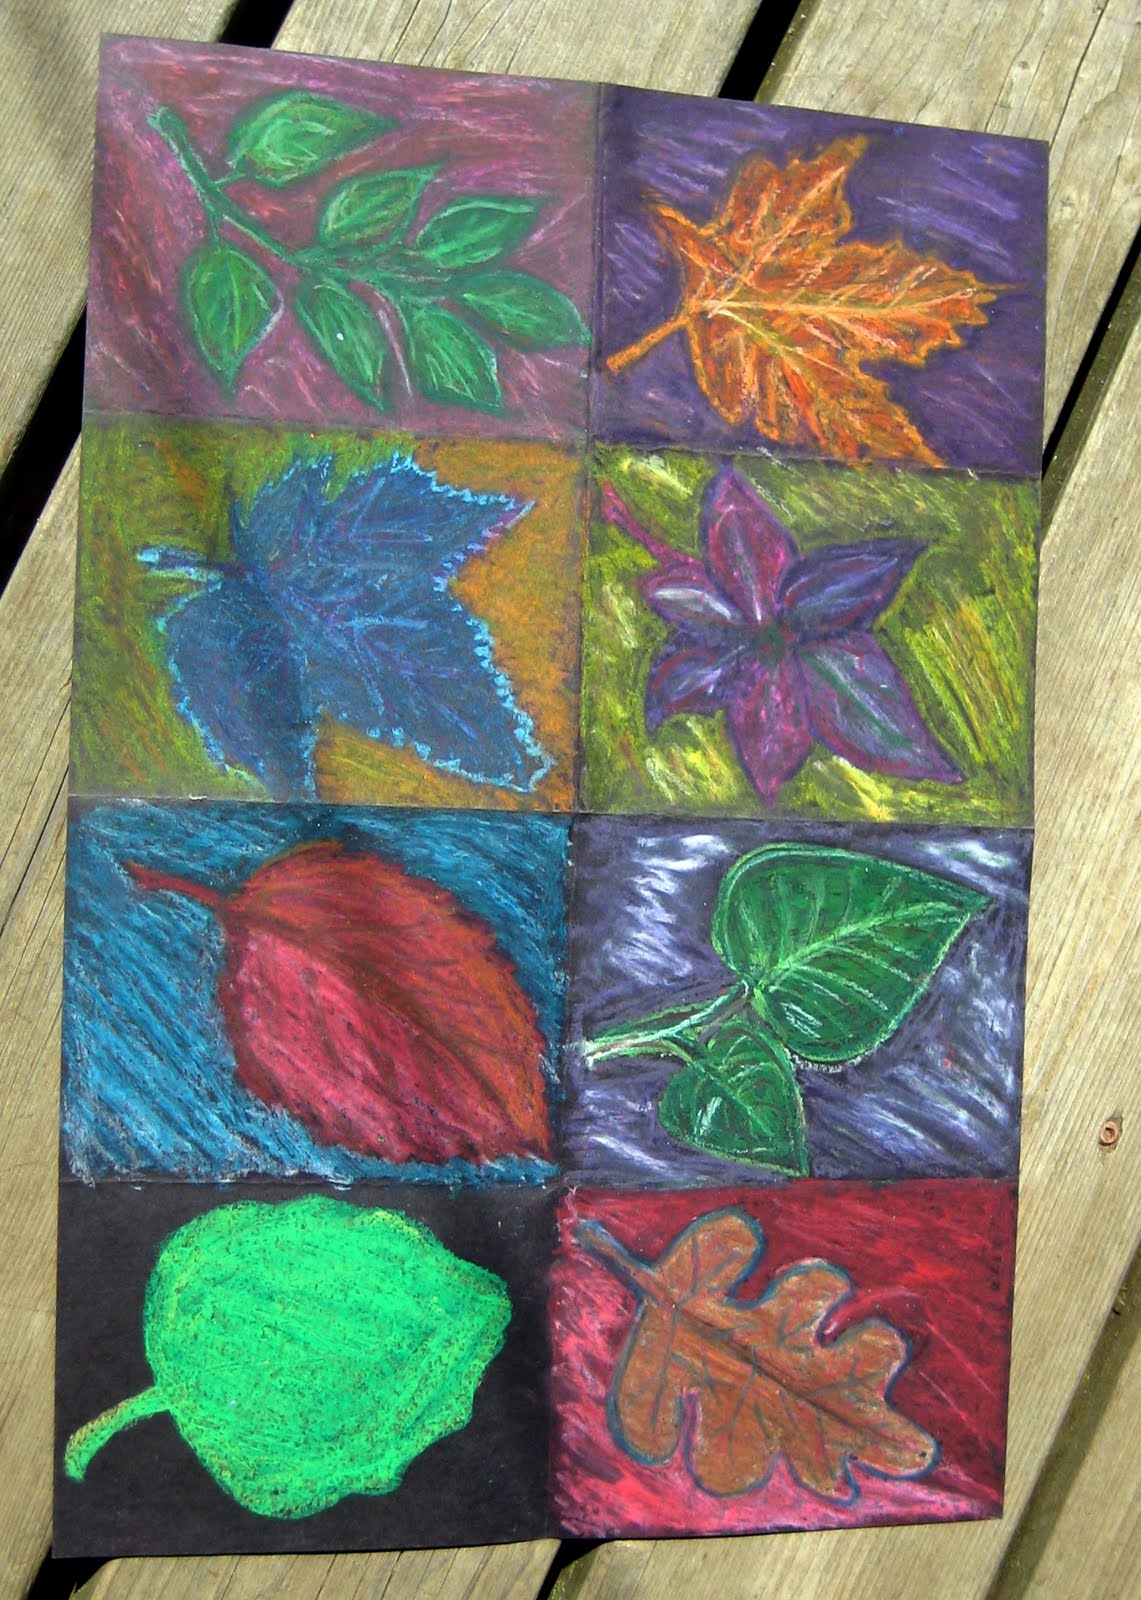
the bucket day 2 - fall oil pastel

A lesson for 3rd grade and up. A good back to school/fall lesson.

Today the bucket brings us another lesson from my student teaching...this one passed on to me from my supervising teacher. I go between liking it and feeling indifferent towards the lesson. And the thing that makes me swing back and forth is the type of oil pastel we use. As I've said before...I hate to call out one brand over another but I find the only oil pastel that really stands out on BLACK are the Crayola hexagon oil pastels. Sorry other brands.

Obviously you can see we have taken a, rather large, sheet of black construction paper and divided it into 8 spaces. Once again size matters. If I were to do this again we would aim for somewhat smaller paper and only six spaces. 6 is great...8 equals burn out. In each example the student burnt out before the end.

The original lesson, as seen above, and flipped because blogger hates me, was intended to be a study of complementary and secondary colors. Students looked at real leaves, drew one in each box and then used oil pastel to explore color. I started requiring white to be used in addition to the color in the background of each box. I also started requiring a neighboring (analogs) color to be used in coloring the leaf itself in each box.
These small changes made a big difference in the visual interest of the work.


Now if we go back to this sample...done with 7th graders, you can see I had branched out into other fall items such as mums and zinnias, gourds and a hard to ID wheat stalk. I feel the gourds and zinnias made a great addition to the leaves as they still have simple shapes but things like the wheat stalk and whatever blue flower was drawn in the upper left hand corner are getting to detailed and monochromatic.

Overall thoughts:
*Pick your oil pastels wisely and test on black paper first
*Go for a slightly smaller sheet of construction paper
*Divided into six instead of 8 boxes
*Draw your item big enough to almost fill the box
*Arrange items at an angle if possible
*Stick with bold, simple shaped fall items: leaves, gourds, sunflowers, zinnias
*Outline the edges of your item with either a dark color or white to make it pop
*Emphasize complementary color pairs and secondary color pairs to help the colors pop
*Encourage use of white in the background at the end
*Encourage use of either a analogous color or tints and shades of the main color inside the leaves


Sunday, March 27, 2011

Paul Klee cities


I hear a lot of ....but I can't draw (whinny voice) so during the last few months we looked at art that used things that the kids DO feel confident "drawing"; shapes, numbers and letters.
3rd-5th graders looked long and hard at Paul Keel's Castle and Sun....although we decided to take more of a city approach than a castle approach. I challenged students to find all the math shapes they could in the painting and had long talks about what makes a parallelogram and geometric vs. organic shapes.

After scanning the art work students were given ruler, pencils and scrap paper to practice making shapes with intersecting lines. No tracers were allowed for this lesson. When students felt good about their ability to use the rulers to create a variety of shapes they could come get card stock from me and draw a city or castle using ruler lines only.

Then I made the students go over EVERY pencil line with a crayon and they could start painting their city with watercolor. I encouraged students to paint a little in one place and then move somewhere else on the paper so they were never putting to wet areas next to each other. Knowing that hint, along with the crayon "walls" their was a lot less color bleeding. I also allowed the kids to use the dreaded black watercolor paint to do night sky's.

This lesson ended up taking about 4 classes and keep the attention of the 4th and 5th graders but the 3rd graders started pooping out at the end. In the future I'll pull out the liquid watercolors for the younger ones to speed up the process.

Thursday, November 11, 2010

Alphabesties lesson

Click photos to enlarge...till I can figure out how to make them big

About a month ago I posted about a "new to me," book I found in the typography section of the library. The book is called Alphabesties: and other amazing types. Each page of the book features a animal that is made up of the first letter of that animals name. Different types of fonts are used to create the animals. The animals in the book are great and each page shows several fonts that go with that animal and get students thinking about how text and type can create an image.

I know you could do some great lessons with photoshop or maybe even picnik and different types of fonts. I don't have access to our schools one computer lab so that is not an option for me...but I would love to see what someone else (with more comp knowledge than me) could come up with.

Instead I saw this book as a way to incorporate writing not only into our art class, but also into the artwork itself. For the second year in a row our 1 school improvement goal is to improve student writing. The other elective teachers and I keep getting dinged on our evaluations for not doing enough writing instruction in our classrooms. (Like I have a ton of time in 20 min classes...)

I did this lesson with 2nd - 7th grade students and they were equally interested with it. It got pretty quiet in my classroom as student had to think how to turn letters and words into images. I did break out my two sets of stencils for this project so that students could focus on the text aspect of the image and we could get done in a timely manor.

For this project each student choose an animal stencil (older students could use two)
Students could use pencil to outline their animal but then had to switch to marker. I asked students to fill in their animal using the first letter of the animals name (2nd grade) or the name of the animal, or a combo of both. Then students were asked to create the environment that their animal lived in using the name of the object. So the sun was drawn using the word sun, waves were drawn using the word wave and so on. Some classes created a boarder using their own name. It was easy to adapt this lesson to different grade levels and the younger students got great handwriting practice and were challenged to use their problem solving skills. I'm afraid I was too sick to get photos of the lower grade work before I let them take them home (and they wanted to keep them for once!) but I did get photos of some 5th-7th grade works.

***I also left this as a sub plan and got equally nice results, so I think this would make a great sub lesson since many grades can do it and it takes minimal materials. I have also found a fun set of Alphabesties flashcards that make a big puzzle. I think these would make a great addition to the classroom and would work just as well as the book.*********


Thursday, March 4, 2010

Tigers!

click on photos to see them larger


Here are some photos of our tiger drawings that 4th grade did. The lesson came from Art Projects for Kids I had them trace around a paint pallet to get the right size and shape of head. I also gave them almond shapes to trace around for the eyes if they wanted. They did a really nice job on drawing these. About half finished coloring their tigers and the rest got tired. I'll keep bringing them out every few weeks till the end of the year in hopes that I get at least 80% of them done. I've put up photos of the kids working on their drawings and the finished projects.