Showing posts with label 6th grade. Show all posts

Sunday, February 17, 2013

Eric Carle inspired collages


6th and 7th graders worked for a while on these Eric Carle inspired collages. I would say the results of this lesson were either wonderful or disappointing with very little in between (not posting the disappointing ones). This group of kids was hit by the flu so a lot of them were out of school for quite a few classes during this lesson which really threw off the momentum of the lesson.
Regardless we got some really neat ones I want to share with you.
she got great texture in the "grass" and I love the paper she made for the puma's body
We found using a mix of tempera and cheep acrylic craft paint helped make the best textures. Adding a touch of metalic craft paint to the painted papers really added something special.
great great job getting texture into the painted paper

Great use of bubble wrap for the background texture

was out sick a lot and it shows....but he had a good start
this is great work for this student, she worked very hard on it and was very proud of it, I love the jellybean print paper she brought in for her rainbow

my photos are not doing this one justice, she did such an amazing job on all aspects of it


The sloth is HUGE, on the biggest sheet of construction paper I could find!

he used the metallic paints well


also out sick quite a lot but another great start

and my sample

In the future I will make sure to have a stockpile of pre-made painted papers for kids to pull from if they are out sick, working really slowly or just need bits of one color. This lesson dragged on a bit longer than I wanted because the kids kept making more and more painted papers.

Tuesday, January 1, 2013

Australian x-ray and dot style animals


All artwork done by 6th grade students with no previous art classes! class of 35 students for this group
(if you "Pin" please, please link back to this post or at least my website....)

The next part of our Australia unit was a x-ray style animal mixed media project. We once again looked at examples of x-ray style rock art and modern day Aboriginal style art that incorporates x-ray style. Last year I learned about the wonderful work of Australian children's author and illustrator Bronwyn Bancroft (you can visit her website here). I try to get several of her books to show the kids how she uses Aboriginal symbols, dot painting and x-ray style to make modern day art. We particularly love her animal ABC book because of all the new animals we learn about.

Next students practice drawing 8 different Australian animals using some worksheets I got from a class years ago. The kids can also look at images from Bancroft's book and try to draw additional animals.

I have tried so many versions of this lesson over the last 8 years from scratch art to paint to oil pastel. With this years combo I am 90% happy and I think next year I will have finally settled on the official lesson.

The kids then choose the animal they want to draw for their final work of art and receive a square 12 inch by 12 inch sheet of light brown construction paper. They use a ruler to make a boarder and then in pencil draw a pattern in the boarder, their animal in the middle and two symbols that would correlate with that animal. So for the platypus above the student added the symbol for river and sun and the emu below has sun and the symbol for emu tracks.
Student's went over all pencil lines with black crayon or sharpie then colored their animal and symbols using colored pencils and paying attention to correct use of material to get vibrant color.

Next came the dotting. I asked the students to find 3/4 colors they used in their animal and symbols and dot around the animal using radiating lines of those colors. Practicing our doting in the previous lesson really helped with the quality of dots in this lesson.

Then came the boarder. I had the kids use black glue to outline the boarder and then set it to dry overnight. 

Then, and this is the part that I still don't love, I had the kids use chalk pastel in two or three colors to color in the boarders. While I think the colors turned out nice and the kids enjoyed using the chalk...even after spraying the colors smudged and started to get messy.  I still suspect that this is an side effect of the super junky chalk pastels I have.
Yet as I have mentioned before, chalk pastel is my least used media in my classroom so I don't want to waste any of my tinny budget buying nice sets. Next year I think I will simply have the kids use oil pastel instead of chalk.
This student convinced me to let her add two baby dingoes instead of two symbols
and this young man choose to draw a Numbat (yes that is a real animal) along with another type of small rodent who's name I don't remember.
 I'm quiet happy with the evolution of this lesson and the quality of artwork this year's student's produced.

Next up: this years Australia unit "wild card" lesson.

Friday, December 28, 2012

Australia dot style mini paintings


Time for 6th grade's yearly study of Australian Aboriginal art. We always learn about dot painting and x-ray style drawing and then throw in something a little different for fun. Last year we made the x-ray style stuffies...I'll post this year's wild card in a few days.  We start our unit learning a bit about the Aboriginal Dream time stories, symbols and dot painting. We talk about why Dream time stories and symbols differ from region to region and most are not to be shared with non Aboriginal people. We also talk about how traditionally dot paintings were not to be shared with non Aboriginals and look at how modern day Australian artists are creating dot paintings that do not revel sacred stories.


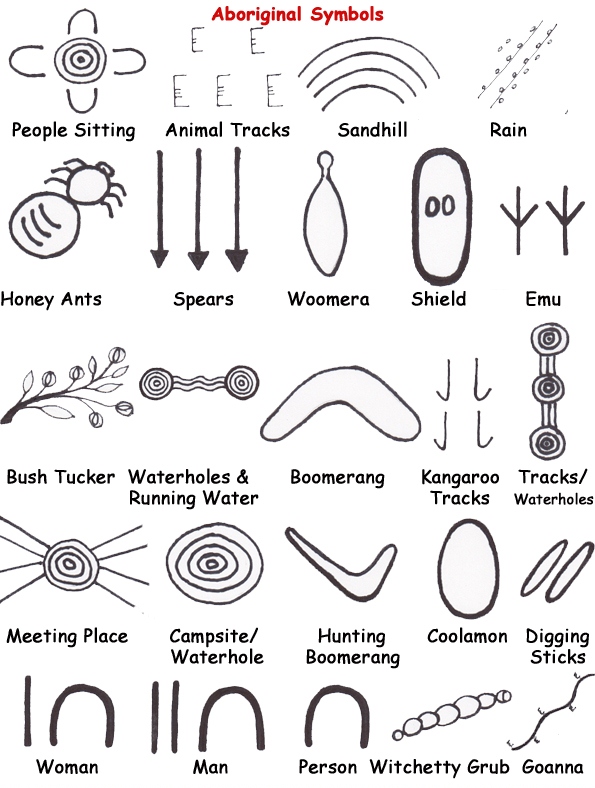
After our day of learning about Australian Aboriginal art we looked at a set of Aboriginal symbols and played matching and story building games...I got my set of symbols from a class I took but we also use this set from Aboriginal art online

and this set from this site http://www.aboriginalartshop.com/assets/Artlandish_Symbols_completed_-_footer2.jpg

After practicing using the symbols for storytelling each student chooses one to three symbols for their mini paintings that are about 3x5 inches and done on scrap matt board.

Students paint their matt board a solid base color with acrylic and set it to dry. When dry they sketch their symbol(s) and paint them in solid black.  Then using either the back of a crayon, the back of a paintbrush or the back or point of a bamboo skewer each student radiates the outline of their symbol in dots using a 2-3 colors.
Doing "mini" paintings makes these novel and keeps the kids from getting burnt out on dotting so the lesson gets done in two days instead of dragging on forever. Plus is gives the kids good dotting practice for their next x-ray and dot style animal lesson.
Great work from this year's group of 6th graders....I wish I had time to post all 35 of them !

Friday, October 12, 2012

classic color wheels


Nothing ground breaking here, just some classic color wheels, but one of those skills I feel all middle school students need to master. 6th graders went through a series of practice exercises before making their final color wheel. First we use crayons and as a group color a color wheel while talking about the primary, secondary and intermediate colors. (Keep in mind some of my 6th graders have never had art). The next class I have table groups work together to paint a rather large group color wheel. They are given the primary colors and have to mix their secondaries and intermediate colors and get them in the correct place on the color wheel.

 After this group challenge I provided some troubleshooting instruction on how to correctly mix colors (what colors are the strongest...moving light to dark and so on) Next class each student has to paint a practice color wheel (takes about 20 min) and then starts creating their final color wheel.

 I pre-print wedges that equal 1/12 of a circle. I ask the kids to manipulate the top arch of the wedge to create a simple shape that will radiate around the circle. Some kids went a little fancier and others stayed pretty plain.

After cutting out the wedge each student traces it 12 times on a large sheet of white paper and then paint their color wheel. When the kids are done painting they need to use sharpie to go over their pencil lines, cut out their color wheel and then glue it to black paper.

 Students are graded on clean brushwork, solid colors and that each student has correctly created their 12 colors.

I don't know if it my camera or editing or computer screen but I feel like the colors the kids made are showing up distorted on the computer screen... particularly in the orange family.

One helpful hint we have learned is to use more of teal blue than a standard blue to get better color mixing. We also add a tinny dot of white to our purple colors to make them easier to see.


Tuesday, October 2, 2012

first lessons 6th grade: radial names


Hey all, we are three weeks into our school year here in Portland. Already we have had a stomach flu and a head cold sweep through the school (and my house) but we still have been plugging away.
This year I teach four sections of middle school. A 7-8th grade class, a 6th grade class and two 6-7th classes.
Let's start with our 6th graders who come in with a WIDE range of art experience from no art to parents who are professional artists.
We started with the favorite radial hidden names...always a big hit. There are so many tutorials on how to do these that I'm not going to bother.(UPDATE: there really are not that many or any good tutorials on how to do this with photos that I can easily find so I will make and post one in the next day or two) I will say we radiate our names 8 times and I have the student's really focus on correctly using the markers to add color.

 As these were hanging in the hall something seemed a little different about them this year. I finally realized that following the whole florescent colors trend going on right now that the packs of markers I had bought had five "florescent" colors that are as blinding as highlighters. The kids loved them...I would have pulled them out of the mix if I had realized they were there.
I also think I liked it better last year when I had all the kids mount their names on black paper. Oh well live and learn. Overall I think they did a great job with this first lesson and they were very happy with the results.


I like how she used brown along with the magenta and orange
Hard to see...but this young man cut out the open spaces in his letters so it is almost like a paper snowflake...anywhere you see black is where it is cut away...very creative
hanging in the main office are the best examples...too bad the glare off the glass makes it hard to see them...


my absolute favorite this year is the one in the bottom right corner... the photo is not doing it justice

and our group display boards.

Coming up next....6th grade color wheels 

Wednesday, May 9, 2012

x-ray style stuffies

Well I may not be posting much but my classroom is creating like crazy. Part of why I haven't posted is because I am in mourning  the loss of Picknik photo editing. I can not find a program I like as much, or find easy enough to use while also playing with my son. I am not pleased with the editing of these photos but they will have to do.


 So onto the project. During our Australia unit this year I wanted to try something different with x-ray and dot style art. I had the students do dot paintings and x-ray style animal drawings as always but then I wanted to see how our drawings would translate into 3-D. I gave the students several Australian animal shapes to choose from and taught them how to sew and embroider. They got really into this lesson and begged to work on them before school even started. Each student learned to straight stitch, back stitch, chain stitch, satin stitch, blanket stitch and some student's learned to make french knots. Other students used puffy paint to add the dot aspect of their design. These took quite a while and I didn't really find a good way to display them but the kids sure loved them and were very proud. Good work 6th grade!