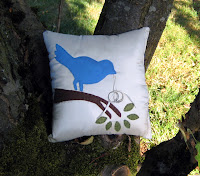
Two of my good friends are getting married this weekend and I was asked to make make them a ring pillow for the ceremony. They knew they wanted a bird and that was about it. After doing a little research I actually ended up using one of my onesie applique patterns.

I was able to get material from a bridesmaid dress that needed to be altered so I know the bird and pillow backing matches everything in the wedding perfectly. The materials for this are an interesting mix of expensive (REAL duponi silk) and eco-cheep (eco felt and batting from an old Ikea pillow). Because I was able to get the material for the bird and pillow backing for free the entire pillow cost less than $5 to make. How is that possible?

(the materials)
Lets break it down:
3 pieces of eco-felt .25 cents each
pillow batting (free from old pillow)
blue silk duponi (free from dress alteration)
1 roll ribbon .50 cents
1 square foot muslin about .50 cents
Real ivory silk duponi-a discontinued special order sample from back in the red tag area $1.50
1 sheet iron on fusible webbing .75 cents.

to make sure everything was nice and stable I bounded a piece of muslin to the Ivory duponi and a piece of eco-felt to the blue duponi that is being used for the bird

so then I used my pattern (cut from a cereal box) to cut out the bird, the branch and the leaves

and pinned it all to the ivory duponi (why does blogger do this to photos?)
and then I appliqued by hand. Yes by hand. I do all my quilting and sewing applique work by hand. I don't believe in using a machine to applique although I know how to. Yes I can make very nice little stitches very rapidly by now. Here is a look at the back side of my applique work.

not to badmouth my sewing machine because it is one of my most prized possessions and I don't let ANYONE use it. I have a less expensive teaching machine for friends who are learning to sew.

from this point on its pretty standard pillow making. I think it ended up being about 9"x9"... a little less when stuffed. I have to say the duponi and the extra layer of muslin makes a big difference for making something that turns out professional and sturdy.

as is I think this is a cute little pillow and I'm happy how it turned out. I like having a variety of textures in my work and the felt and duponi is a nice mix.
But it is a ring pillow so I sewed on a little ribbon at the bird's beak and used my wedding and engagement ring (2+ years later and I still need to get them joined!) for the photo.

I'm quite happy with the end result and hopefully they will remove the ribbon and keep the little pillow as a handmade reminder of their wedding for years to come.


 (the materials)
 to make sure everything was nice and stable I bounded a piece of muslin to the Ivory duponi and a piece of eco-felt to the blue duponi that is being used for the bird
 so then I used my pattern (cut from a cereal box) to cut out the bird, the branch and the leaves
 and pinned it all to the ivory duponi (why does blogger do this to photos?)

 from this point on its pretty standard pillow making. I think it ended up being about 9"x9"... a little less when stuffed. I have to say the duponi and the extra layer of muslin makes a big difference for making something that turns out professional and sturdy.
 as is I think this is a cute little pillow and I'm happy how it turned out. I like having a variety of textures in my work and the felt and duponi is a nice mix.

